Christopher Kimball’s Milk Street Television
New Cookie Classics
9/10/2024 | 27m 20sVideo has Closed Captions
Milk Street elevates classic cookie recipes with secret ingredients and new techniques.
Milk Street takes your favorite cookie recipes to the next level! Christopher Kimball begins with a grown-up version of the ultimate classic, Rye Chocolate Chip Cookies. Then, Bianca Borges combines sweet and salty with crunchy and chewy to bake Peanut-Butter Miso Cookies. Finally, Rose Hattabaugh looks to the Middle East for inspiration and prepares Tahini Swirl Brownies.
Problems with Closed Captions? Closed Captioning Feedback
Problems with Closed Captions? Closed Captioning Feedback
Christopher Kimball’s Milk Street Television is presented by your local public television station.
Distributed nationally by American Public Television
Christopher Kimball’s Milk Street Television
New Cookie Classics
9/10/2024 | 27m 20sVideo has Closed Captions
Milk Street takes your favorite cookie recipes to the next level! Christopher Kimball begins with a grown-up version of the ultimate classic, Rye Chocolate Chip Cookies. Then, Bianca Borges combines sweet and salty with crunchy and chewy to bake Peanut-Butter Miso Cookies. Finally, Rose Hattabaugh looks to the Middle East for inspiration and prepares Tahini Swirl Brownies.
Problems with Closed Captions? Closed Captioning Feedback
How to Watch Christopher Kimball’s Milk Street Television
Christopher Kimball’s Milk Street Television is available to stream on pbs.org and the free PBS App, available on iPhone, Apple TV, Android TV, Android smartphones, Amazon Fire TV, Amazon Fire Tablet, Roku, Samsung Smart TV, and Vizio.
Providing Support for PBS.org
Learn Moreabout PBS online sponsorship♪ ♪ ♪ ♪ - Today on Milk Street, it's gonna be, well, risky business.
We're gonna mess with three of your favorite recipes: chocolate chip cookies, brownies, and peanut butter cookies.
Well, what's wrong with chocolate chip cookies?
Well, they're sweet on sweet.
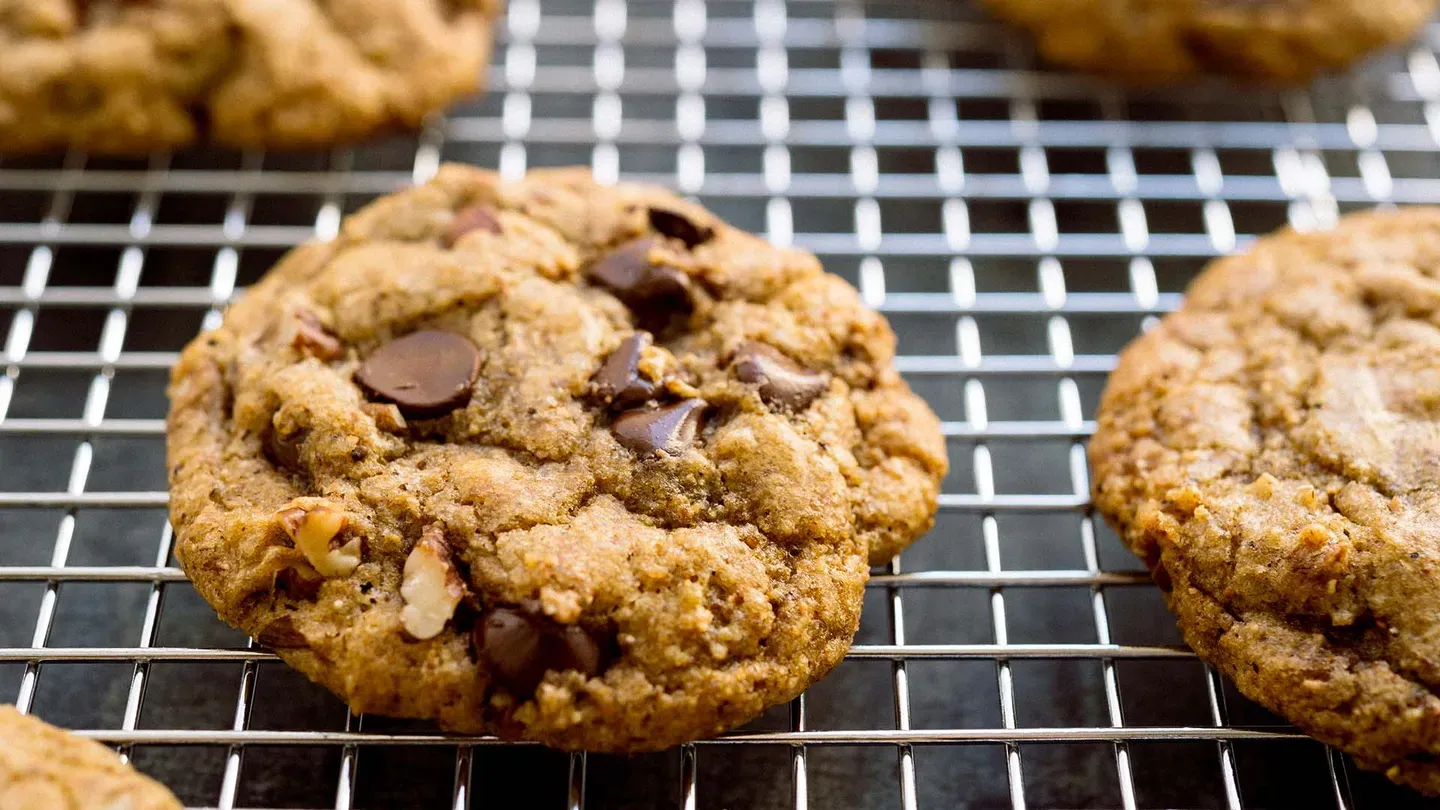
We're gonna toast some rye flour and add that to the mix, which makes a superior chocolate chip cookie.
For the brownies, we're gonna take some tahini and swirl that in, which I think is a great combination.
And finally, and here we get really risky, we're gonna do peanut butter cookies, but we're gonna add a really big surprise ingredient which, believe it or not, is miso.
So please stay tuned here at Milk Street as we mess with, and hopefully improve, three of your baking favorites.
- Funding for this series was provided by the following: - MOWI salmon comes ready to cook, ready to grill, ready to season, or pre-seasoned and ready to eat.
In an assortment of flavors for an assortment of people.
MOWI Salmon.
- We pass down traditions here.
We create and connect.
We enjoy special moments-- some simple, some grand.
The heart of your home is the kitchen.
The heart of your kitchen is The Galley.
♪ ♪ - I've been around too long and am experienced enough to know I shouldn't stand here and say "this is the best chocolate chip cookie in the world."
Because of all the things you worry about every day as we all do, everything else going around the world, the thing I'm certain of is you have a very strong opinion about which type of chocolate chip cookie you like.
You want it thin and crisp, you want it thick and chewy.
You want it underbaked, you want it overbaked.
So I'm not gonna say it's the best.
I'm gonna say I personally feel-- what a coward I am-- that this is the best chocolate chip cookie in the world.
And the reason is it solves the fundamental problem of chocolate chip cookies.
And you might say, well, there are no problems with chocolate chip cookies-- I think there is a problem.
It's sweet on sweet.
So what we're going to do is mix up the flour a little bit.
Instead of just using all-purpose flour, we're going to also use some rye flour.
Rye flour, it's common to use it in baking more and more these days.
It adds a little base of, well, bitterness might be the right word, a nice foundation for the sweet.
And the second thing we're going to do is we are going to toast it without any fat to start with in a skillet.
And so not only do we have the slight-- I hate to use the word bitter, because it's not really bitter-- but that slightly savory flavor of the rye, we're gonna actually enhance it by toasting it.
Now, one thing, you know, I've started thinking about lately is, you know, white flour, all-purpose wheat flour has no flavor.
It's sort of like white sugar.
And so the more I bake, and I do a lot of baking, the more I want to use other kinds of flours because they tend to have, you know, almond flour, rye flour, et cetera, they have flavor.
And so one way to improve your baking is by using different flours.
Now when you toast it, you really want to get it toasty, it's gonna change color, and like with sugar, when it starts to brown or starts to caramelize, it's going to start going fast.
So it'll be boring, boring, boring, and all of a sudden it starts to change color.
Might even smoke a little.
And if you're worried about over toasting it, just take it off the heat and then that'll obviously cool the pan down quickly.
Okay, now it's starting.
You can see it starting to get a little browner.
This is definitely a time where you don't want to take a phone call, step out of the kitchen, put a video on.
You can actually start smelling the flour now, which is great.
By the way, rye flour, I also use it in pancakes, which is really nice.
I use it in pizza dough.
Just don't use too much of it, but it really adds flavor.
So that looks pretty good.
You got a little bit of smoke coming up.
It's toasted, I'm gonna take it off the heat for a second.
Put in the butter.
Turn this heat down just a little bit.
That's good, we're gonna turn the heat off, okay.
We'll let this sit off heat for about ten minutes because we don't want to add it to the egg mixture.
So we have white flour, half teaspoon of baking soda, because we're going to put molasses in that.
Molasses is acidic, so we need to use baking soda with that.
Quarter teaspoon of salt, couple eggs, molasses, just a little bit, some flavor, vanilla, of course-- by the way, many recipes that call for vanilla, I often double the amount.
And the sugar.
Okay, we've let this cool and now we're gonna incorporate the toasted rye and butter into the mix.
I've said this a million times, but when you use a whisk, you just want to go back and forth, cause you wanna keep the tines in the mixture at all times.
If you go like this, and the tines are coming out into the air, you're not actually doing anything.
That's a nice batter.
Add the flour mixture-- I'm going to switch to a spatula now.
Want to make sure you get the bottom of the bowl, that's where those little pieces of flour hide.
And now we have the chocolate.
Um...
...I always make a little bit more chocolate because I end up eating a lot of it.
Pecans-- you don't have to use nuts.
I know that's... anathema to some percentage of the chocolate chip cookie world.
Also, you notice we're not using chips, we're chopping up chocolate-- I like this better.
Chips are designed not to melt when they're baked, they retain their shape.
And I find that just regular chocolate is a little more liquid-y and it tastes better than chips.
So the best way, when you're doing cookies or muffins or whatever, you can buy a whole series of these in different sizes.
They often have color-coded handles.
You can buy them for, like, $20 for a whole set.
And that's the best way to portion out any kind of a batter.
Okay, put that aside, bring out the other one.
You know, I've been doing cooking shows for a long time, and this is always the part where you start to get nervous, because you want to make sure you have enough dough to fill up the tray.
So we'll see how I did.
People often ask, do I actually eat the food, you know, that we cook?
And the answer is, "Yeah."
And I magically left just enough for me to eat before it goes in the oven, hm.
Now the two ways to do this.
You can do one tray at a time and then switch it around halfway through baking.
This is gonna be 12 to 15 minutes or so.
Or you can do two trays at a time.
Especially if you have a convection oven, this would be a good time to use it.
But we're gonna do two trays at a time.
And halfway through baking, after about seven minutes or so, we'll switch positions and flip them around.
And that should do it, because the lower tray doesn't get as much heat as the top tray from the top of the oven.
So 12 to 50 minutes.
We'll switch around halfway through, let them cool, and also we'll give you a little trick to help you figure out when the cookies are baked.
♪ ♪ When the cookies are done-- soft in the center, but firm on the edges-- take them out, let them sit on the baking sheets on a wire rack for about five minutes.
Then take the cookies off the parchment and let them cool on the wire racks for about ten or 15 minutes.
You know, a lot of people come up to me and say, you know, you have such a great job.
And I say, well... (chuckles) "If you really knew what the job was, you might not say that."
But I have to say, there are moments like this when you have a couple dozen chocolate chip cookies made with rye flour.
Then my job's pretty good.
So let's just talk about one thing, which is properly baking.
You can tell they're still moist inside.
Now here's something that everyone does with cookies, including chocolate chip cookies.
They wait until the center of the cookie is set, right?
They push their finger down, it doesn't leave a divot.
Then they go, "Oh, they're baked, we'll take them out."
Well, what happens is cookies will continue to cook.
It's just like a pumpkin pie at Thanksgiving.
You want the center to be not set, while the edges are set, so you check the edges, they're set, the center's not set.
That's when you take it out, cause it'll continue to firm up as it sits on the baking tray for a few minutes.
So always underbake your cookies cause it will continue-- mm-- it will continue to bake.
So enough talking.
Let's see if it lives up to the hype.
As I said, I didn't say this is the best one in the world.
I said, "I think this is the best one in the world."
Mm.
It's the best one in the world.
(laughing): Sorry, that is really good.
You know, you really need that rye flour, that toasted rye flour, to play off the sugar.
Otherwise, it's sweet on sweet on sweet.
So I think this is the best.
And I kind of think if we did a competition, we might win it.
But I'm sure other people would like to enter that competition to see if they can win it.
So a great chocolate chip cookie needs balance.
It needs something to offset that sugar.
And that is, in this case, toasted rye flour along with some all-purpose flour.
And I think it makes-- I'm just gonna say it-- the best chocolate chip cookie in the world.
♪ ♪ - I'm just gonna come right out and say it.
These peanut butter cookies raise some eyebrows, but stick with us for a few minutes.
Cause these peanut butter miso cookies really are so worth it.
The idea for these came from a baker named Casey Wall; he lives in Australia, though he's not Australian, but he opened a bakery there.
And he knew that Australians were not all that hot on peanut butter, but that they practically live on this fermented yeast product called Vegemite.
Now he switched that idea very cleverly to incorporate the fermented soybean product of miso.
We made a few adaptations to the recipe ourselves to go with American ingredients.
Now, peanut butter cookies are really kind of considered a great American classic.
So why mess with that?
Well, A, at Milk Street, it's what we do, but only when there's a compelling reason to do so.
And we found that the combination of peanut butter and miso was just phenomenal.
So we'll start with the traditional creaming of the butter and the sugar.
We have a stick of regular salted butter.
Now, when it comes to the sugar, there's a lot of options.
The Australian sugar is actually very different.
It has a coarser texture.
So we tried out all granulated sugar-- cookies went flat We tried out all brown sugar-- not great either.
But what we really decided on was the combination of light brown sugar and granulated sugar consistently gave us that chewy center that we were really wanting.
So we'll add both sugars to the butter, and we'll let this cream for a few minutes on a medium-high speed.
Now, the creaming process not only blends the sugar and the butter together, but once the sugar is incorporated into the butter, it begins to aerate.
Having the air in the butter and sugar is what gives the cookie its loft.
Okay, we're halfway through the creaming here.
This is just the butter and sugar so far.
Now we'll add the peanut butter, the miso, and a little bit of oil.
For peanut butter, we're using good old regular peanut butter, but chunky style, because we wanted little bits of texture that the peanuts bring.
Now, resist the urge to use the fabulous all-natural peanut butter, because that oil separating at the top will really mess with the texture of these.
You want a fully-homogenized basic peanut butter, and we are using white miso instead of red or brown.
But you can use any type of miso for these.
You're just going to have a stronger flavor of miso if you use the red miso or a brown rice miso.
But white miso is just slightly sweeter than red, and it complemented the peanut butter really nicely.
And now we added just a little bit of oil.
Now, the baker in Australia used peanut oil, which, of course, makes sense, it's a peanut butter cookie, But we loved the flavor of sesame oil, so we made that choice.
Now, you don't see sesame oil that often in sweet things, but it goes really nice with the miso and, it turns out, great with peanut butter, too.
All right, now we'll put this back on medium-high and give it another two or three minutes to finish creaming.
Okay, this is beautiful.
Light and fluffy.
You can see the color changes.
The more air that's incorporated, the lighter the color becomes.
Now we have our dry ingredients: standard all-purpose flour, a little baking soda, and a little baking powder.
Now, there's no salt in here, right?
Not only is our butter salted, but miso itself has a very salty underlying quality to it.
So our dry ingredients are mixed and ready to go.
We'll set those aside for just another minute.
We'll add the egg and vanilla to our batter.
Now, these just get mixed in just until combined.
We'll add the flour gradually.
Okay.
That's it, dough's done-- as you can see, I mean, it's just a few subtle changes of ingredients, right?
And you have a whole different animal of cookie.
All right, we'll scrape this down and we will let this refrigerate for about two hours up to 24 hours.
Now, the dough is nice and stiff.
You could certainly scoop it out and bake it now.
However, there's a benefit to letting this sit in the fridge for a little while.
Just making sure this is fully combined, that there are no dry floury areas-- fine.
So I'm scraping it down, cover it with plastic, and then we're just going to press the plastic right onto the surface of the dough.
That will just make sure it doesn't form a skin.
Into the fridge it goes.
The dough is in the fridge about two hours, nice and chilled, nice and hydrated.
We're going to divide it into 18 portions.
I'm just gonna use a scoop.
You don't have to be exact right now.
You can always adjust the quantity later if one ball is bigger than the other.
You know, when I was in grade school, I met my ideal peanut butter cookie.
One Tuesday out of every month, they would make these gigantic peanut butter cookies.
I lived for that Tuesday, practically.
It had a crispy edge, a dense, thick, chewy center.
It was the size of my palm.
And I spent a lot of time trying to replicate that cookie and come up with a recipe that was reliably the same thing.
It's very hard to do, and I often didn't hit the mark.
But these cookies, the texture of these cookies remind me of that childhood cookie I had, and they're unbelievable.
All right, good.
So I'm just gonna take a little bit from a few of these.
This is how you do it-- this is the pro way of redistributing your cookie dough.
Now we'll just round them off into balls.
This dough is so nice and pliable.
You can see it's not even sticking at all.
We have our 18 balls of cookie dough.
Now, this is optional, of course.
We're gonna dip the tops in turbinado sugar.
Turbinado is a very coarse-textured cane sugar.
It does give a little bit of crunch to the top of the cookie and kind of a sparkly texture.
It's really nice.
So we're just gonna do the top of the cookie.
You don't need to do the whole thing.
Okay, our oven is preheated to 350 degrees.
Now we bake one sheet at a time to ensure that the tops and the bottoms get evenly cooked, just the way we want them.
Okay, ten minutes.
Oh, yeah.
Okay, now, these cookies are at their most delicate right now.
They're puffed up, but they're still mostly raw in the middle.
So it's a perfect time to deflate them a little bit.
(banging loudly) Hm!
There you go.
You can see them start to go.
They'll finish deflating in the oven.
These get another five to seven minutes.
The edges get lightly brown and crisp.
The centers will still be really soft when they come out of the oven, but as they cool, they'll firm up just enough to give you that chewy center that we love.
♪ ♪ Okay, we are in the home stretch, these are done.
Put them on a wire rack in the sheet tray and let them sit for about ten minutes, and that way they gently finish baking.
I mean, the crackle on these is just fabulous.
They have the beautiful look.
They're a little misshapen and that's perfect for these cookies.
So we'll give these ten minutes on the sheet tray.
Then we take them off the tray, put them on the wire rack, and let them cool completely.
You can certainly eat these cookies while they're warm and the temptation is huge.
But you won't get the full effect of that chewiness until they've cooled almost to lukewarm.
So we wait.
Okay, they're cool enough, we're going for it.
These are fabulous.
Just put them on our tray here.
I mean, there's what you want to see.
A beautiful crackle top.
You see how level they are?
That's from that banging down.
And when you break it open-- oh.
See?
Easy, breaks open.
But the edges are crispy, mm-hm.
The inside, perfectly chewy.
That miso is just really a delicate underlying background flavor-- you get the peanut butter first, then you get something kind of complex and salty, savory.
And then you get that little edge of sesame oil in there.
It's like, hm that's familiar, what is it?
These are for me, with my lifelong obsession with the texture of a peanut butter cookie, the ideal texture.
And they make extraordinary, for the summer, ice cream sandwich cookies.
So this is Milk Street's peanut butter miso cookie.
Expand your mind, accept the possibilities, and you will be rewarded, mm.
♪ ♪ Wes and I are here to talk about something very, very serious.
- Why do cookies spread?
- When you don't want them to?
(chuckles) We are going to give you some examples of reasons cookies might spread and ways to prevent that if you don't want them to spread.
We're starting with our recipe for a molasses cookie.
So if you want a cookie not to spread, one of the primary things you can do is chill the dough before you bake it.
Just like the peanut butter miso cookie we just made, chilling the dough gives the flour a chance to fully hydrate, which means it simply absorbs the moisture that's already in the dough.
We chilled for 30 minutes, and then we chilled for two hours.
And you can see, there's a huge difference between the rise and the spread within these cookies.
- Yeah.
- If you look at these, you can see they're higher in texture.
I'm gonna look at the inside and you're gonna see a little bit of a difference in the crumb.
- This is the 30 minutes.
- Mm-hm.
Love this, it's cakey, but it's still got a little bit of a bounce to it, which I love.
- A little chew, yeah.
- Mm-hmm.
The two hour chill is still firmer.
But still delicious.
The takeaway here is, I mean, really, there's no wrong way to make a cookie.
But if you want to prevent your cookies from spreading so much, chilling the dough is one great way to help with that.
And we even have another way, don't we?
- Yes, in the type of fat that you use and how you work with it when the cookie is constructed; we did a little experiment here with melted butter, as this cookie was written, creamed butter, and creamed shortening, and they are vastly, vastly different.
- Yeah.
- The textures are completely different with the creamed butter and the shortening cookies.
And the reason there is aeration.
It almost looks like we doubled the baking powder or baking soda in the recipe, but we didn't.
Now, when these bake up, they have a really nice interior as well, but they held their shape more.
And the reason that is, is that creamed butter coated the proteins in the flour and held that cookie to a tighter bake.
So that's just a couple things to keep in mind the next time you make a batch of cookies.
If you're getting a big spread with your cookie on the baking sheet, try chilling the dough for at least a half an hour, and that will help them hold their shape.
You could also try switching up how you create the cookie dough in the first place.
Melted butter is gonna give you a spread.
Creamed sugar butter cookies are going to hold their shape better.
- Cookie mystery solved.
- Phew!
- (chuckles) - Everybody loves a classic brownie, but we wanted something a little more complex, so we took our inspiration from Tatte Bakery in Cambridge, Massachusetts.
They make a halva brownie that has chunks of halva in it, which is a Middle Eastern candy that is made with tahini and sesame paste.
So we love that rich flavor with chocolate and so we decided to come up with a brownie that melds those two delicious ingredients.
So first things first, you want to take an eight-by-eight baking pan, and I have two sheets of foil, 14 by seven inches.
I'm gonna put them perpendicular so they're hanging over the pan-- this is gonna help us get them out without cutting through your pan, which I hate to do.
And we're gonna butter that so that we can get our brownies out.
So first we're gonna add some butter.
One of the things that we were playing around with when we were making this brownie to get something really fudgy, but not too greasy and not too dense, was the amount of tahini to butter.
Tahini has a lot of fat in it, and obviously, so does butter.
So we played around with those ratios and ended up with little less butter, a little less tahini, added some eggs for a little cakey-ness, but not too much.
And so that was kind of a nice combination for these.
The first thing we're gonna start with is melting our butter.
And when that's melted, we're gonna add some chocolate, which of course, brownie.
But we did find with the tahini, we took out some of the chocolate, cause that also has a lot of fat in it and added cocoa powder.
So we're still getting all that chocolatey flavor, but with a little bit less fat.
So I'm just gonna melt this till it's nice and creamy, whisk it together, and put it aside.
I'm gonna whisk together some eggs, sugar, a little bit of salt-- always add salt to a dessert.
Kind of heightens the sugar.
I know that sounds strange, but it definitely does.
And a little bit of vanilla.
So we want to whisk this for about a minute until it gets a little bit lighter and a little bit thicker.
Of course, you could use a mixer, but if you don't want to take a mixer out, it's nice to just be able to do everything in a bowl.
Okay, this looks pretty good to me.
It's thicker, it's lighter.
And now I'm going to whisk in our tahini.
So instead of just adding the tahini to a chocolate mixture, we decided to make the tahini mixture and add chocolate to that.
And you'll see why a little bit later.
So I'm gonna whisk in the tahini till it's pretty well incorporated.
And now...
...I'm gonna add our flour and just fold that in.
Just until it's combined.
So before I add the chocolate, I'm actually gonna take out a half a cup of this mixture, and I'll show you why a little bit later.
Now this is a half-cup scoop, and I'm gonna put that aside, and then I'm gonna add the chocolate.
Okay, so again, we're just gonna fold this in until it's incorporated as you would with any brownie batter.
And once I've got it all combined, I'm gonna pour it into our pan.
You can really smell everything; the chocolate, the tahini.
All right, so I'm gonna spread this in an even layer, and then I'm gonna go back to this tahini batter that we reserved.
And I'm gonna dollop this on the top of the batter so that we can make really pretty design.
That's also gonna kind of help highlight the tahini flavor.
It also makes it look pretty fancy with not a lot of effort.
I love a dessert where people will be wowed but you haven't done anything really extravagant.
I like to do nine kind of evenly spaced blobs.
That looks pretty good.
And I'm just gonna take the tip of a knife and kind of marble it through.
This is one of those things where I'll just keep going.
But you don't wanna do that.
Cause then you'll lose the nice pattern.
It looks pretty, doesn't it?
So we're gonna put it in a 350 degree oven on the middle rack for 28 to 32 minutes.
You really wanna make sure these are cooked all the way through.
Or the center can be kind of wet.
So you're looking for the edges to kind of rise up, the center to be firm, but it might look a little bit wetter than the sides.
But you wanna make sure it's cooked all the way through.
♪ ♪ ♪ ♪ So these cooled in the pan for 30 minutes.
Then I removed them with our handy foil sling, put them on a cooling rack and let them cool completely.
I'm going to remove the foil.
so we don't get foil in our brownie when we cut them.
So it should peel right off because we buttered the foil.
So this makes 16 brownies.
The way I like to do it is I'm gonna cut them in half, cut each half in half and then I'm gonna do the same thing horizontally.
The longer you wait for these to cool, the easier they will be to cut.
I know it's hard to wait, but try.
That should give you 16 fairly even brownies.
I'm not always perfect with the cutting, but people eat them anyway, even if they're not perfectly cut.
Okay, we'll say that.
So here are our tahini brownies.
Having that swirl on top really does give you that extra tahini flavor, and they look really pretty.
So if you bring these as a treat somewhere, I think people will be really impressed.
Or you can just serve them to your family.
But they're delicious.
They're kind of complex and a little bit nutty.
The tahini and some really nice chocolate, because we have cocoa and we have chocolate in these.
You can get this recipe and all the recipes from this season at MilkStreetTV.com.
- Recipes and episodes from this season of Milk Street are available at MilkStreetTV.com, along with shopping lists, printer-ready recipes, and step-by-step videos.
Access our content anytime to change the way you cook.
- The new Milk Street Cookbook is now available and includes every recipe from our TV show.
From cacio e pepe and skillet spanakopita to Brazilian-style carrot cake and Thai coconut soup, the Milk Street Cookbook offers bolder, fresher, simpler recipes.
Order your copy of the Milk Street Cookbook for $27, 40% less than the cover price.
Call 855-MILK-177 or order online.
- Funding for this series was provided by the following: - MOWI salmon comes ready to cook, ready to grill, ready to season, or pre-seasoned and ready to eat.
In an assortment of flavors for an assortment of people.
MOWI Salmon.
- We pass down traditions here.
We create and connect.
We enjoy special moments-- some simple, some grand.
The heart of your home is the kitchen.
The heart of your kitchen is The Galley.
♪ ♪ ♪ ♪


Support for PBS provided by:
Christopher Kimball’s Milk Street Television is presented by your local public television station.
Distributed nationally by American Public Television